Monday, March 31, 2014

Saffron and Lemon Orzo

This lemony saffrony orzoy pasta will make a wonderful side dish to any entrée whether it be with chicken, beef, or shrimp. Saffron is actually the most expensive spice in the world. That means if you want to impress someone, use saffron!  Saffron is from the Crocus flower and people not only use it in food, but they use it as fabric dye as well.


I decided to make this recipe because I am always up for something new. I've never cooked orzo pasta nor have I ever used saffron in any recipe before. I have never tasted saffron either, so I didn't know what to expect. To my wonderful surprise, this dish was delicious! It was buttery, lemony and fresh! It was extremely quick and easy, so do not be afraid!  You can do it!

The saffron is blooming! 

Add the orzo to the saffron infused chicken broth.

Add the ingredients to the cooked orzo!

Completed recipe!! Delish

Saffron and Lemon Orzo


Ingredients
  • 4 cups low sodium chicken broth 
  • 1 teaspoon saffron threads 
  • 2 cups dried orzo 
  • 2 tablespoons extra virgin olive oil or any other oil you have around 
  • 2 tablespoons unsalted butter, softened 
  • 1 whole lemon, juiced 
  • 1 teaspoon lemon zest 
  • 1/4 cup flat-leaf parsley, roughly chopped 
  • 1-2 teaspoons salt, to taste 
  • Ground black pepper, to taste 
Instructions
  1. In a large pot, bring the chicken broth to a boil over high heat; then reduce the heat to low and bring the stock to a simmer. 
  2. Add the saffron, stir, and allow the saffron to bloom for about 5 minutes. 
  3. Return the heat to medium and bring the stock to a boil. 
  4. Add the orzo and cook until tender, but still firm to the bite – about 8 to 10 minutes. Stir occasionally. 
  5. Drain orzo (even if there isn’t much liquid left) and transfer to a large bowl. 
  6. Add the olive oil, butter, lemon juice, lemon zest, salt, pepper, and parsley. Toss to combine.

I would love to know if you try out this recipe, so please let me know in the comments or on Google+.

Thank you for stopping by!
XOXO Shelly

Monday, March 17, 2014

Spicy Pad Thai with Chicken

I love Thai food. My favorite Thai food restaurant is in Hollywood, CA. It's called Torung Restaurant; it only takes cash, the parking is across the street at the gas station, and it's the best Thai food you will ever have. My go to dish is the Kang Ka Ree, which is yellow curry with potatoes, carrots, onion and your choice of meat.  Even my dad likes this place the best for his favorite dish, Thai Fried Rice, and he is picky!


But today, we aren't talking about curry or fried rice.  Today we are talking about Pad Thai. This is a favorite not only with me, but all across America as well as Thailand. There are street carts in Thailand making this noodle dish for tourists and citizens to enjoy. It was originally concocted in order to lower domestic rice consumption (Thailand's largest export was rice) and promote Thai nationalism during WWII (sorry, I love history). Anyway, I have been testing out this recipe for a while now and this one is a winner!  I hope you have fun trying it out!


Continue below for tasty looking pictures and recipe!

Mince garlic and chop shallots.

Slice up the green onions.

Juice some lime juice!

Chicken before...

... chicken after!

Saucey goodness mmmmm!
  
Noodles added to chicken!

After bok choy and green onions are cooked, scramble the eggs on the side of the pot.

Finished!

Plated!

Yummy close ups below! 
I'm totally eating this for lunch tomorrow...


Pad Thai


Estimated time to make is 45 minutes

Ingredients

Sauce (makes about 1.25-1.5 cups)
  • 1/4 cup palm sugar (can use brown sugar as substitute)
  • 1/2 cup chicken broth
  • 3 tablespoons fish sauce (can use 1-2 tablespoons salt as substitute)
  • 2 tablespoons soy sauce
  • 1 whole lime, juiced
  • 1 tablespoon apple cider vinegar
  • 2 tablespoons garlic chili sauce
  • 1/8 tsp. ground white pepper
  • 1-3 tablespoons sriracha sauce, to taste
Pad Thai
  • 1/2 of the pad thai sauce (use more if desired)
  • 2 tablespoons vegetable oil (for stir frying)
  • 1 package of rice stick noodles (white, flat noodle)
  • 1 shallot, diced
  • 4 cloves garlic, minced
  • 3 eggs, beaten
  • 3 bunches of baby bok choy, roughly chopped
  • 1lb chicken breast or thigh, cut into 1 inch chunks
  • 1/4 cup chicken broth
  • 1 tablespoon soy sauce 
  • 1 tablespoon sugar
  • 1 bunch of green onions, sliced (1/2 for cooking, other half for serving)
  • 1 cup fresh bean sprouts (optional)
  • 2 tablespoons unsalted peanuts, finely chopped (optional)
Instructions
  1. Start by adding 1 tablespoon of oil to a medium sauce pan and turn to medium heat.
  2. Add your garlic and shallots and stir fry for 1-2 minutes until fragrant.
  3. Next, add the rest of the sauce ingredients in the same pan and turn the heat to low until palm sugar/brown sugar is dissolved (it will only take a few minutes).
  4. While the sauce is doing its thing, chop the rest of the ingredients and bring a large pot of water to a boil. Once it’s boiling, drop the whole package of noodles in and let them boil for 2-3 minutes; until limp but too firm to eat. 
  5. Turn off the heat, drain the noodles in a strainer, and rinse them with cold water (the cold water will help stop the cooking process so the noodles don't get too mushy). Leave the in the strainer for now.
  6. Back to sauce! Once the sugar is dissolved in the sauce pan, increase heat and boil for a few seconds. Remove from the heat. The sauce is done!
  7. Now it’s time to stir fry. You’ll need 2 utensils to stir fry the pad thai (I used two wooden spoons). It is easier to separate the noodles this way, so they don't stick together.
  8. Add 1 tablespoon of oil and 1 tablespoon soy sauce to the same large pot you cooked the noodles in (trying to save pots here).
  9. Turn the heat to medium and drop in the chicken chunks; cook until done (about 6-8 minutes, test by cutting the largest piece with your wooden spoon). 
  10. Add the drained noodles and 1/4 cup of chicken broth and toss. Then add the bok choy, green onions, and 1/2 of the prepared Pad Thai sauce. Mix into the noodles.
  11. Make sure to constantly separate the noodles to prevent them from sticking to one another. If noodles are too sticky, add a little more oil. 
  12. Once noodles, bok choy, and green onions are cooked (2 minutes), it’s time to add the eggs. Move noodles to one side of the pot and toss the beaten eggs in. Scramble and stir the egg until cooked (about a minute or so).
  13. Turn off the heat, add the sugar, peanuts, and bean sprouts and toss until thoroughly combined.
  14. Serve with more green onions on top!  Enjoy!
I would love to know if you try out this recipe, so please let me know in the comments or on Google+.

Thank you for stopping by!
XOXO Shelly

Friday, March 14, 2014

Wonton Soup

Asian foods are probably my most favorite kind of food out there. Thai, Chinese, Japanese, Korean, Filipino, Malaysian... I'll stop there because I could go on for a while. They just always entice my taste buds! I tend to do a lot of Asian style cooking (FYI). What can I say? It's so yummy! 


Bubbling goodness!!

I think it all started when we remodeled our kitchen. We had no stove, no oven, no dishwasher, no nothing and we ended up ordering take-out A LOT. We tended to order stuff from this awesome Chinese food restaurant two blocks from our house. One thing that was always in our to-go order was some kind of soup whether is was egg flower, wonton, or something else (my dad is a soup guy). For that time it was like a new tradition in our family.

The weather here in Los Angeles has been very volatile lately. One day it is 80°F one day and 55°F and windy the next, so on those chilly days soup is a great option to help counteract the elements. I chose to make wonton soup on one of those days because it seemed super tasty and fun to make with the family! We all made wontons and reminisced on life during the kitchen remodel. We all agreed it was horrible and no one knows how we survived it.

Continue below and learn how to make wonton soup for yourself!

Chop up all of your ingredients first!

Wonton filling!  OMG.

We used this brand of wonton wrappers.

Makin wontons! 


Little guys waiting to be cooked!

I want to eat this entire thing.  Seriously.


Finished product!  
I added an extra teaspoon of the garlic chili sauce to my bowl of soup.  Perfectly spicy!

Wonton Soup


Wonton Filling
  • 1/2 cup finely chopped Napa cabbage (4-5 leaves)
  • Salt (for cabbage)
  • 1/2 lb ground pork or turkey
  • 1/2 bunch of green onions, finely chopped
  • 3 cloves garlic, minced
  • 1/2 shallot, minced
  • 2 teaspoons ground ginger
  • 1/2 small can water chestnuts, minced
  • 1 tablespoon soy sauce
  • 1/4 teaspoon white pepper
  • 1 teaspoon toasted sesame oil
Wonton Assembly Ingredients
  • Rectangular or square wonton wrappers (3 1/2-by-3-inch)
  • Prepared wonton filling (from above recipe)
 Wonton Filling Instructions
  1. In a medium bowl, toss cabbage with 1/2 teaspoon salt. Let stand 10 minutes. Wrap cabbage in a double layer of paper towels; firmly squeeze out excess liquid.
  2. Return cabbage to bowl and mix well with the rest of the wonton filling ingredients.
Wonton Assembly Instructions
  1. Work with one wrapper at a time, and keep the rest covered with a damp towel on an oiled plate. Spoon one rounded teaspoon of filling in center of a wrapper.
  2. With dampened fingers (or a brush), wet the four edges. Form a triangle by folding the wrapper in half over filling, making sure the ends meet and filling is centered; press down firmly to seal.
  3. Moisten one tip on long side of triangle. Bring together both tips on long side, overlapping them slightly; press tips together to seal (you can keep them in this triangle shape or continue to the next step).
  4. Fold remaining top corner back. Transfer to an oiled plate; cover with a damp towel to keep moist. Repeat with remaining wrappers and filling.
  5. Once wontons are made, set aside (keep them covered with moist towel).
Soup Ingredients
  • 4 cloves garlic, minced
  • 1/2 shallot, minced
  • 4 cans low sodium chicken broth 
  • 4 cups water
  • 1 medium head bok choy, torn into 2-inch pieces
  • 16 snow peas
  • 2 tablespoons soy sauce
  • 1 tablespoon garlic chili sauce
  • 1/2 teaspoon toasted sesame oil
  • 1/2 bunch of green onions, sliced (for topping)
 Soup Instuctions
  1. In a large pot, sauté minced garlic and shallots for 2-3 minutes at medium-high heat until very fragrant.
  2. Add broth and water; turn to high heat and bring to a boil.
  3. Add wontons one at a time; return to a boil. Reduce heat to medium, and simmer until wontons are just cooked through, about 4 to 6 minutes or until they float to the surface. There will be a lot of wontons, so you may like to cook half, remove them from the broth and set into a bowl, and then cook the other half.
  4. Add bok choy and snow peas and cook until bright and tender. Add back the first half of the cooked wontons if you separated them.
  5. Stir in soy sauce, garlic chili sauce, and sesame oil. Serve with the more green onions on top. Yum!

I would love to know if you try out this recipe, so please let me know in the comments or on Google+.

Thanks for stopping by!
XOXO Shelly

Monday, March 10, 2014

Napoli Style Pizza - Margherita Pizza and More

In January I went to this pizzeria in Long Beach, CA to meet some friends from out of town.  The place we met at was called Michael's Pizzeria, I had never heard of it before, but it was supposed to be really good. Well... that was an understatement.  The pizza there was the best pizza I had ever had in my entire life!  I wanted to go there and eat it every day!  But Long Beach is pretty far from my house, so the next best thing was to make it myself.


Well that turned out to be a big undertaking.  It was hard to find the Napoli style sauce that I wanted which is what I thought made the pizza so tasty.  I'm not sure if I got the sauce exactly how its traditionally done, but I would say that its the best dang pizza I have ever made.  Enough of the back story, on with the PIZZA!


First step when baking anything! Preheat the oven! Preheat it to 400°F.

Pre-cooking the dough!


Napoli Style Pizza


Dough 

I bought the canned dough from the grocery store for this recipe (Ralph's/Kroger brand), but I have two links to recipes for homemade dough below.


Instructions for canned dough (also on the can)
  1. Preheat oven to 400°F, if you haven't done so already.
  2. Put a very small amount of oil or cooking spray onto a cookie sheet to help the dough not to stick.
  3. Place the dough on the cookie sheet and press dough out from the middle and toward the edges (picture above).
  4. Pre-cook the dough for 5-7 minutes, depending on the package.
  5. Take out the slightly cooked dough and place onto your stove or a wooden cutting board.
  6. Go to "Sauce" for the next steps.

We used this brand of tomatoes this time, but I think any San Marzano canned tomatoes will work.
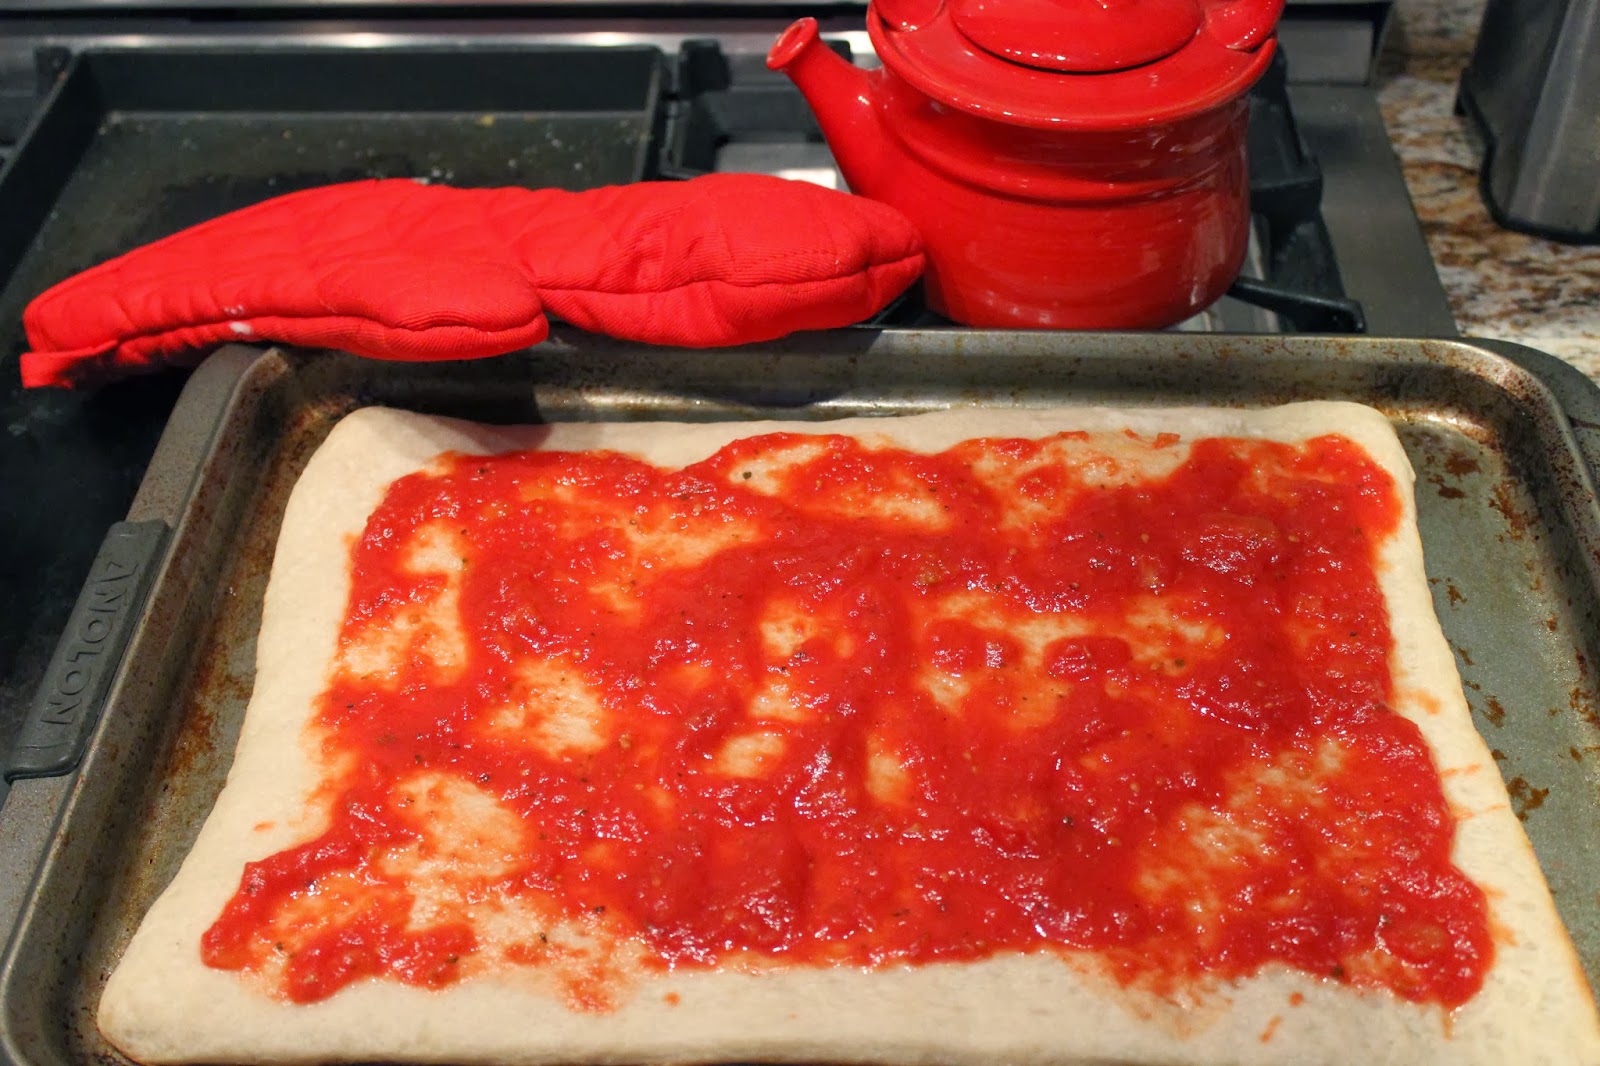
Sauce blended!
Sauce (we used this amount of sauce for 3 pizzas)
  • 1 (28-ounce) can of San Marzano whole tomatoes
  • 2 cloves of garlic, roughly chopped
  • 1/2 teaspoon dried oregano
  • Salt and pepper, to taste
Instructions 
  1. Place the sauce ingredients into a blender or food processor and pulse until smooth with small chunks (picture above).  This will take only a minute or less.
  2. Spread evenly onto the pre-cooked pizza with a spoon before adding other ingredients.
  3. Go to "Toppings" for the next steps for each pizza.
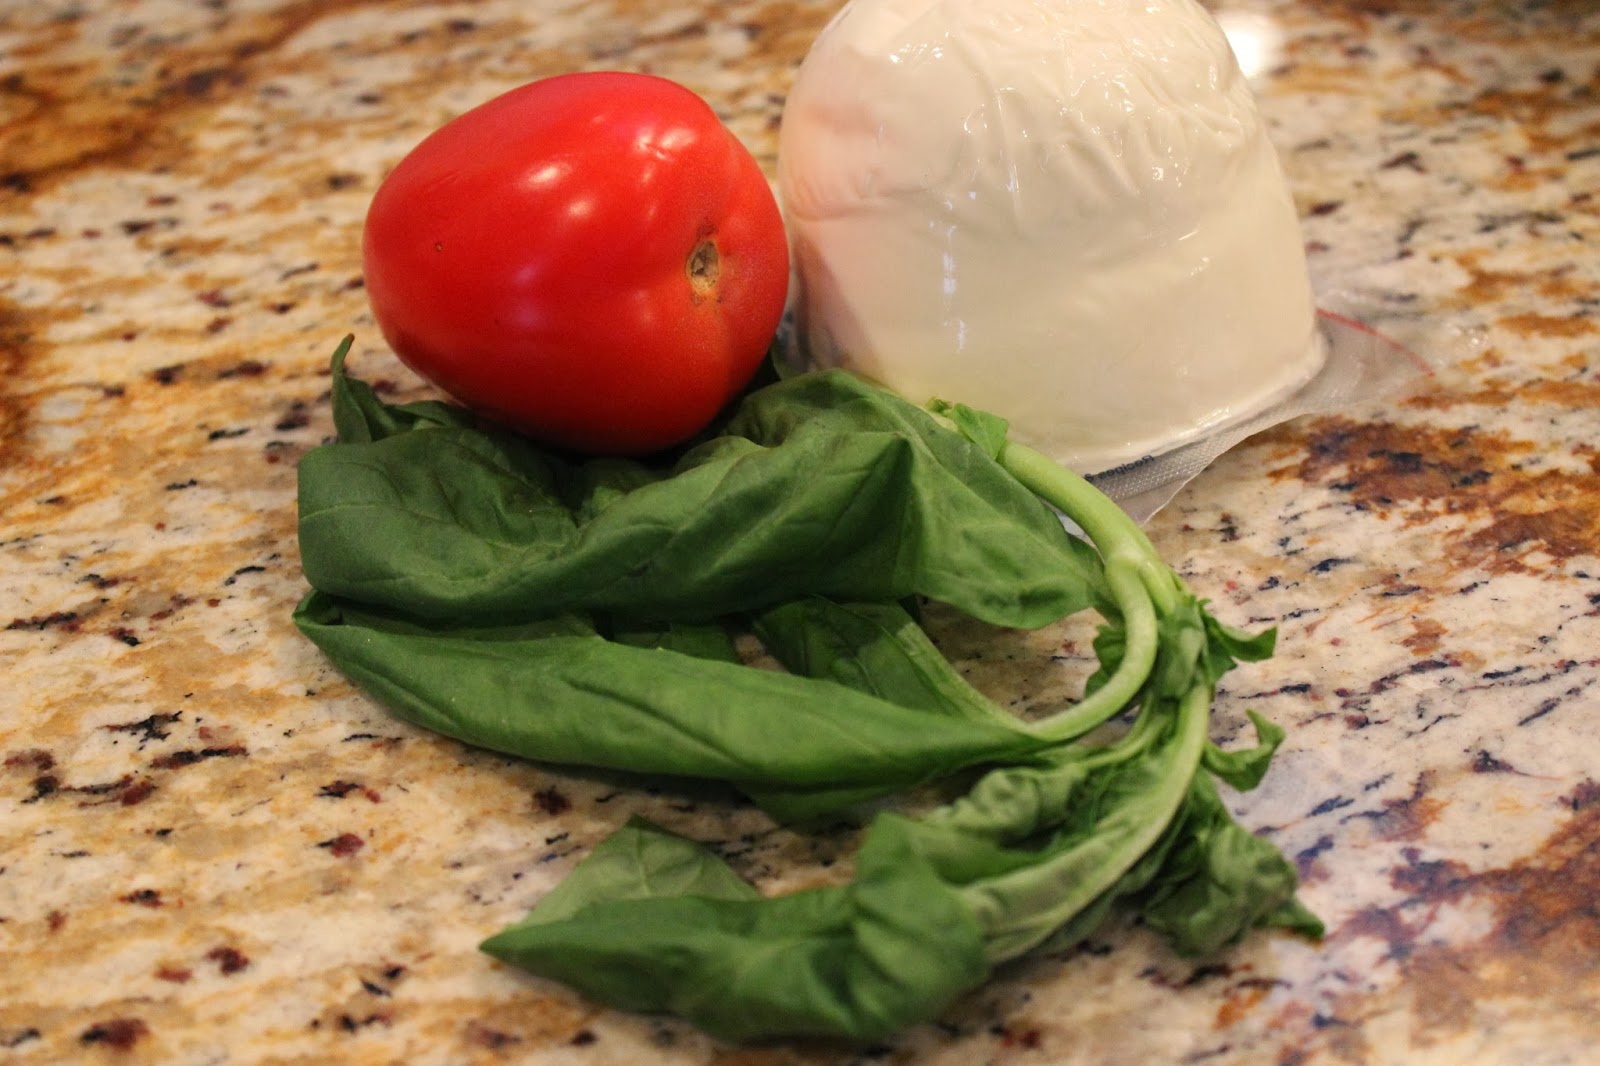
Some pretty ingredients.

I found this cheese at Ralph's (Kroger).

Sauce time!

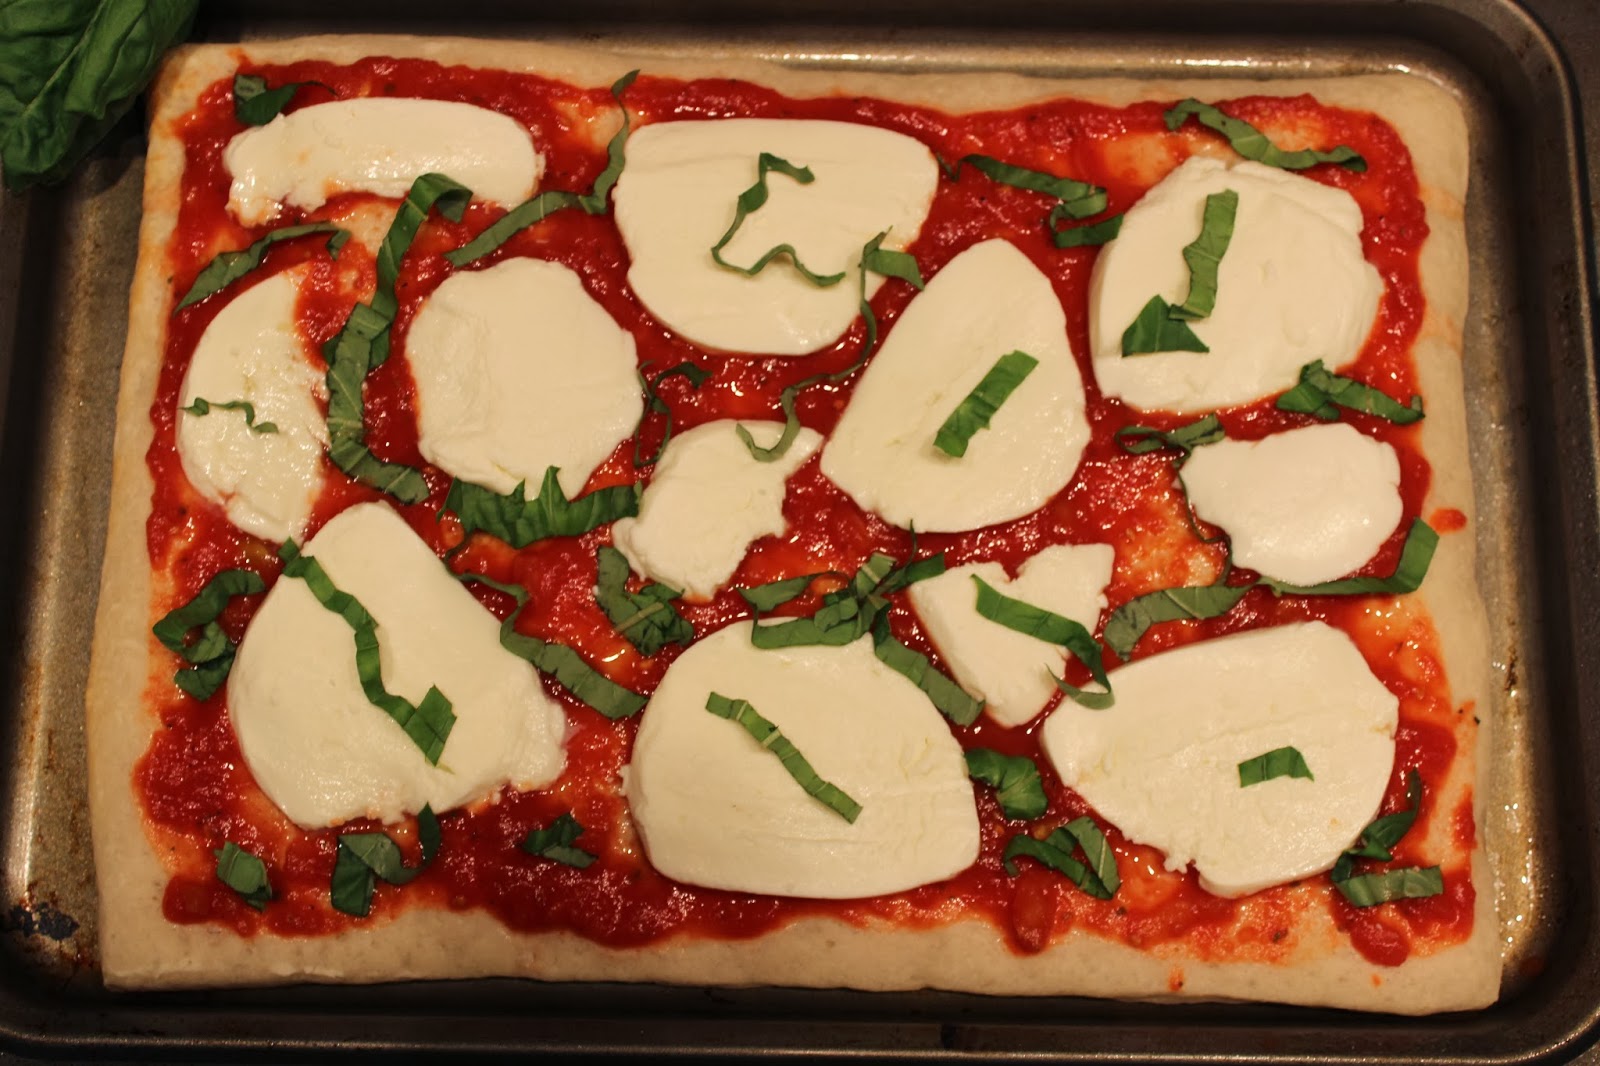
Completed Margherita Pizza before it goes into the oven.

Toppings for Margherita Pizza (shown above)
  • 1 whole package of fresh mozzarella (8 oz), sliced into disks
  • 1 roma tomato, sliced into disks
  • 5 fresh basil leaves, ripped or sliced
Instructions to complete the pizza
  1. Add toppings and then the fresh mozzarella and basil on top.
  2. Put the pizza back in the oven for 7-10 more minutes or until done and cheese is nicely melted.
  3. Cut pizza into slices and enjoy!
You can really put anything on pizza, so that's what we did here.  

Toppings for Special Vegetarian Pizza (shown above)
  • 1 whole package of fresh mozzarella (8 oz), cut into chunks
  • 1/2 sweet onion, sliced
  • 1/2 red bell pepper, sliced
  • 1 roma tomato, diced
  • 1 jar of artichoke hearts, drained
  • 1/2 can black olives
  • 1/2 box of sliced mushrooms
  • 5 leaves fresh basil, ripped or sliced
Instructions same as above!


Toppings for Half n Half Pepperoni Pizza (shown above)

On Half:
  • Shredded mozzarella cheese
  • 4 slices of thick cut deli pepperoni (can use any kind of pepperoni)
On Other Half:
  • 1/2 a box of mushrooms
  • 1/2 can of black olives
  • Shredded mozzarella cheese
  • 4 slices of thick cut deli pepperoni
Instructions
  1. Put the mushrooms and olives on first, then top it with shredded cheese and then the pepperoni.
  2. Put the pizza back in the oven for 7-10 more minutes or until done and cheese is nicely melted.
  3. Cut pizza into slices and enjoy!

Melted cheese and perfectly done crust!

Nom.

That yellow-orange stuff is grease.  Gross!  But soooo good!
(The bf's pizza = the greasiest)


Please enjoy the following yummy close ups!


I would love to know if you try out this recipe, so please let me know in the comments or on Google+.

Thanks for stopping by!
XOXO Shelly

Saturday, March 8, 2014

Introduction

Hello fellow foodies!  Welcome to my blog, Food Coma with Shelly.  I am Shelly, as you may have guessed.  I was inspired to start a blog all about food and recipes when I realized that cooking is a huge passion of mine (plus I broke my leg and I had nothing better to do with my life than make up recipes for me and my family to try, but its still a passion either way).  I create and test out all types of recipes with the goal being to make it perfect!  My family helps me out with this; they are very opinionated.


Food is something that brings people together.  It invites companionship and helps relationships blossom.  Think about it, what do you do on Holidays with family?  Bring/eat food.  What do you do on a special occasion?  Bring/eat food!  You get the idea.  PLUS everyone needs to eat!  So why not do it with people you love and care about. 

I will be posting recipes and pictures as well as new food I encounter that I might want to try to make myself.  Trying new things is so much fun to me.  It doesn't matter if I loved it or hated it.  The fact that I tried something new makes things so much more interesting.


My goal is to share recipes and experiences with others so everyone can try new and different things!  Or at least live vicariously through the pictures of food.

(The pictures above and below are from the other night when my family and I were making homemade Napoli style pizzas.  The recipe will be in an upcoming blog post!)


I wanted to post some silly pictures of me so that you could get a feel for my personality and how I will be doing things around here.  I like to laugh and have fun and I know this will also translate into my blog.

(I was telling the bf to come back into the picture)

(He said no)

Please follow to stay tuned to Food Coma with Shelly!  I will be posting some yummy things in future and you do not want to miss it!

Shelly 3 on Make A Gif

Thanks for stopping by!

XOXO Shelly